 Raspberry Pi is often used for retro-arcade machines. It really fits well there: low power usage, reasonable emulation software support (it is based on Linux after all), more then capable processor, and really cheap price ($35). It is hard to beat this.
What surprised me is that I couldn't find proper Raspberry Pi HAT that could be used to treat buttons as a keyboard. Yes, there are guides how to setup buttons, but they don't do auto-detection and require a bit too much setup for my taste.
There are also USB devices to which you can connect buttons but I find them a bit annoying to deal with in physical sense. While they do offer huge amounts of buttons, them sticking out of Raspberry's side is always ugly to see.
What I wanted to build was maximum amount of buttons I can get away with using only natural HAT connections and without the need for any driver not available out-of-box. Of course, it should be a proper HAT with EEPROM, auto-configuring everything needed as soon as machine is booted.
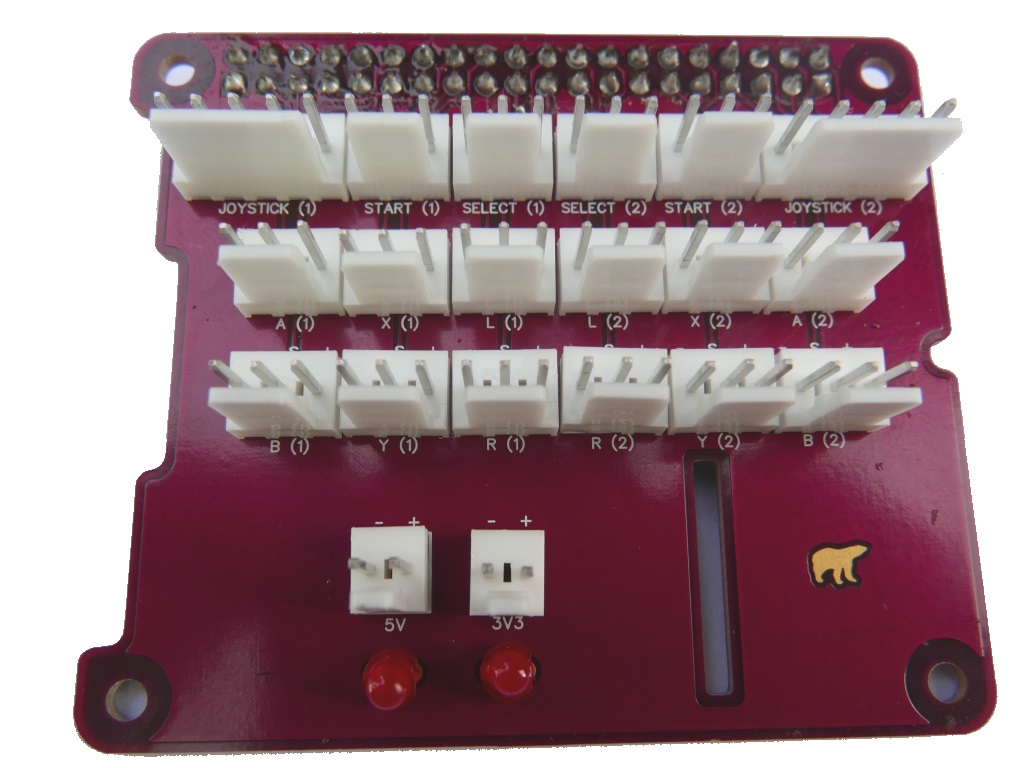
First of all, with number of available pins on HAT connector it became clear there is a hard maximum at 24 buttons. Assuming 2 players, that comes to a joystick and 8 buttons (A, B, X, Y, L, R, Start, and Select) per player.
As HAT gives you quite respectable surface to work with, connectors for these buttons could also include a LED support at the cost of few resistors. Moreover, a discrete (fused) connector for both 5 V and 3.3 V rail was added. While neither is intended for heavy use, it comes in handy for powering various extra components in your retro-cabinet.
For keyboard emulation, this HAT uses a built-in support for GPIO keys. As long as you connect momentary button between GND (-) and pull-up input (S) it will detect each press as the transition from high to low and simulate the appropriate button. Default keyboard configuration is selected in such manner that player 1 configuration matches default RetroPie settings while all keys for player 2 are assigned numbers 0 to 9.
Of course, you can configure all this just by modifying retrohat.dts, a file whose creation took probably more time than board design, soldering, and everything else. But it was worth it to get auto-configuration running once EEPROM is programmed. To get more information on how to program the auto-configuration EEPROM, you can either go over read-me file or check how I did it for Cananka.
In any case, check project's page for a short description and to find link to source files so you can build your own.