Fair amount of my time is spent in 3GPP specification world. Quite often I do that to figure out some minor details of random AVP I am analyzing. And no, I won’t probably go to the specification directly if search can work as well. So, imagine my surprise when I found 3GPP-Session-Stop-Indicator is specified incorrectly wherever I looked for it.
Want examples? Check it here, or here, or even here. Every time you see it specified, you will find the same data type: UTF8String. Which sounds plausible until you see it in the real world diameter snoop. There you’ll find its content is always 0xFF. So, what’s wrong with that?
If you read through RFC 6733, you will see that UTF8String data type is defined to use UTF-8. Guess what bytes sequence can NEVER appear in UTF-8? Darn 0xFF. As per RFC 3629, the highest byte value actually defined would be 0xF3. If you know anything about Diameter, the only sane answer is that this AVP is supposed to be of OctetString data type. So, where is this confusion coming?
I would place blame on ETSI TS 129.061 aka 3GPP 29.061. Incidentally, you won’t find 3GPP-Session-Stop-Indicator text anywhere in the specification. But you will find 3GPP-Session Stop Indicator defined with the following text:
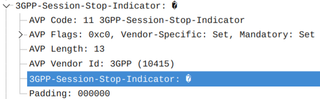
3GPP Type: 11
Length: 3
Value is set to all 1.
3GPP-Session Stop Indicator value: Bit String type
Both 3GPP-Session Stop Indicator and 3GPP-Session-Stop-Indicator share code 11 with vendor 10415 (yes, we’ll ignore 3GPP calling it a “type” instead of “code”). They are the same AVP. Interestingly, length is specified as 3 which makes no sense as far as diameter goes. This is because this wasn’t originally specified for Diameter but for RADIUS. And, in RADIUS, length is indeed 3 bytes (or octets if you want to be fancy) once we add header to the single data byte. When Diameter came, 3GPP just promoted it into the new world without bothering to redefine it in any follow-up specification.
Now that we know we’re looking at the correct AVP, despite slight differences in name and length, what is the definition? It is defined as a bit string with all bits set to 1. Not UTF-8. Bit string. Which, in Diameter world, would mean its type is OctetString. And something that’s a single byte with all ones set is also known as 0xFF.
My guess is that someone originally misinterpreted “bit string” for “string” and thus it got written as UTF8String in the dictionary. Since 0xFF is just a single byte, nobody actually bothered to set it as string but they assign direct value when it comes from the sender. On consumer side, why would you even read this AVP when its value is always the same - there is no other value that 0xFF defined in any of 3FPP specifications as far as I can see. Thus, received only checks if AVP is present. Maybe some also check content but don’t bother converting to UTF-8 for a single byte. And that’s it - mystery solved - this was an OctetString all along.
Am I the first person to find this issue? I doubt it - anybody converting this to UTF-8 would see the issue. It is clearly visible in the darn Wireshark as text converts to “�” which is what UTF-8 decoder would return when it CANNOT convert. But I guess that most people looking at this were smart enough to just let it go. :)

