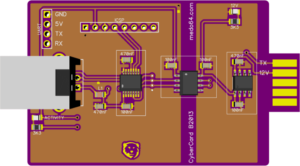
 To keep my file server and networking equipment running a bit longer in the case of power outage, I have them connected to CyberPower OR500LCDRM1U UPS. It's a nice enough 1U UPS but with a major issue - no USB connection.
Well, technically there is an USB connection but it doesn't work under anything else than Windows. If you want it working under Unix, the only option is RMCARD205, optional network module upward of $150. Essentially doubling the price of UPS.
And it's those internal connections Jeff Mayes took advantage of for a simple serial interface. If the only thing you want is a serial interface, you might as well go with his interface driver as price is really reasonable.
However, his boards require you to either have a serial port or to have an USB-to-serial cable. What I wanted was direct USB connection. Since there was nothing out there, I decided to roll my own.
Since I had an UPS locally, it was easy enough to get physical dimensions. Unfortunately just measuring them wasn't sufficient as they narrow as you go deeper so my first assumption of 3.1x1.7 inches was a bit off. Due to that and bottom connector that was a bit shallower then expected, the final board dimensions were more like 71x43 mm. It took a bit of probing to find the 4 signals I needed were grouped together with GND and RX on the bottom while TX and 12 V were on the top.
Connecting the appropriate serial connections to UART-to-USB converter like MCP2221A was a minimum required but I felt a bit queasy about connecting it directly to my computer. Therefore I decided to isolate the UPS interface from the computer. For this purpose I used Si8621 digital isolator offering 2,500 V isolation which was probably an overkill but allowed me to sleep better.
The last physical piece needed was a cover for card to avoid having a large opening in the back of my rack. While risk of anything getting inside is reasonably low, making a 3D printed cover was easy enough. It took a few tries to get cover design right in TinkerCAD but it avoided having a gaping hole.
If you are interested in making one for yourself, check project page for all the files.