 With my current ZFS pool getting close to its 2 TB limit I started to think about expanding it a bit. However, before doing anything with main NAS server, I decided to get the backup server up to speed. Reason is simple: while I am not a ZFS newbie, I don't move pools on regular basis and moving backup server's data will give me nice practice opportunity so I have procedure pinned down when I go to deal with the main storage.
My main parameters were to build machine capable of at least ZFS mirror, be reasonably easy to hide as it will be situated in living room, be as quiet as possible, and cost no more than $300 for all the hardware excluding disks. Note that nowhere I have any conditions on its speed - it is a backup machine I hopefully will never touch again.
For the case I went with Supermicro SC504-203B 19" 1U rack mountable chassis. Some of you might be reasonable wondering which drugs I am taking that causes me to think of 19" rack case as unobtrusive and easy to fit in living room. Well, you are missing a detail that my TV stand is piece of solid wood with opening that is about 25" wide and 2" tall. Just enough for me to slide the case below and for it never to be visible again.
As point of interest, you might notice Supermicro offers SC504-203B and SC505-203B rack cases that have seemingly identical specs. It took me a while to figure out the only difference: 504 has all the connectors in the back and 505 has the motherboard connectors at the front. For my case, more common setup of connectors at the back was better, but your mileage might vary.
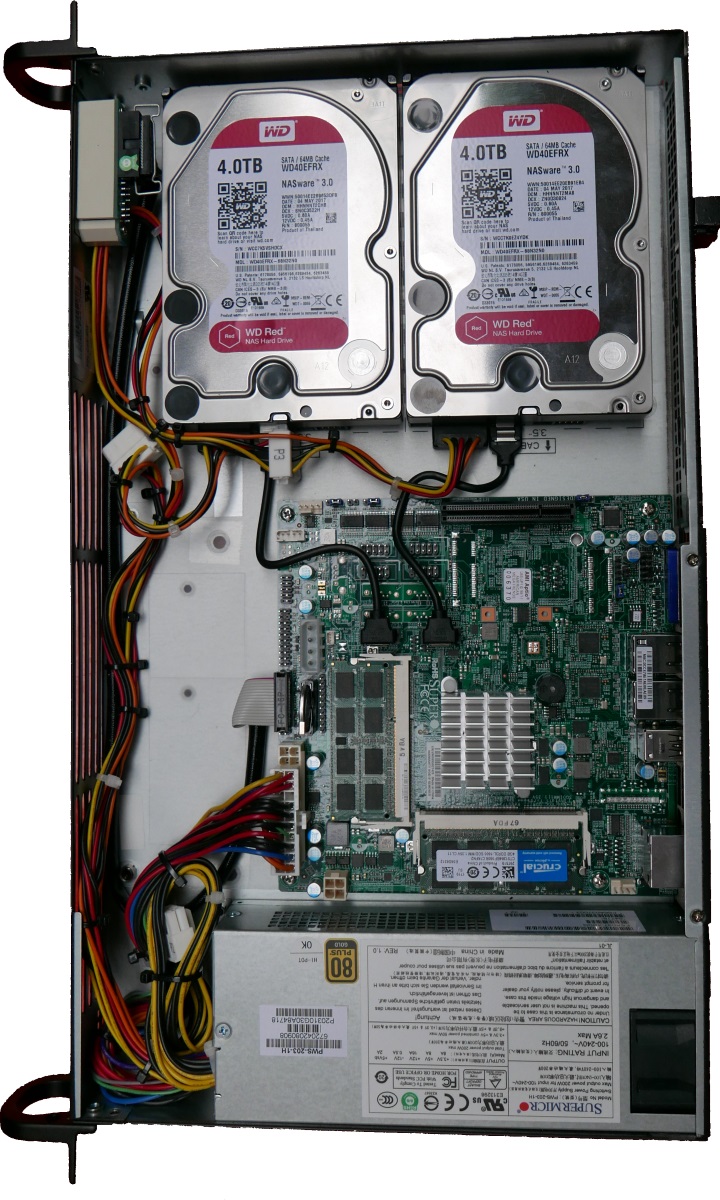
Other than its perfect size, this case is one of rare in the lower price range to have enough place for two 3.5" drives. As I am really not too happy with my current situation of backup on a single (albeit) ZFS-formatted drive, upgrading backup to a mirrored combo seemed like a long delayed improvement. Other than that, case has an efficient power supply (80+ Gold) alongside a wide selection of compatible boards.
And there is also a bummer - not all mini-ITX boards can fit this case. Better said, they will fit the case but their IO shield will be a tad too high for an 1U format. Yes, you can always go without the shield or by frankensteining the solution but I actually found a reasonably priced Supermicro board.
I decided to go with X10SBA-L board instead of similarly priced but seemingly more powerfull X10SBA. The "L" board doesn't have additional Marvell chip and thus it has only two SATA 2.0 ports (Marvell brings additional four SATA 3.0 ports), it has one USB 3.0 and three USB 2.0 ports where Marvell offers additional two 2.0 ports, it has m-SATA port (which cannibalizes one of SATA 3.0 ports), and lastly it lacks eDP. For me neither of those were breaking deal as I intended to use only two disks with the single USB 3.0 port carrying Nas4Free installation.
A bit controversial decision is lack of ECC memory support that is not really frowned upon when dealing with ZFS. In reality, I couldn't find any ECC board that would fit within my budget. And, while memory is important for ZFS, let's not forget that this is just a backup machine and that memory errors are usually not catastrophic. Plan is to have ECC RAM on my next ZFS server. But my backup server - mah...
Speaking of memory, I essentially selected the cheapest 2x 4GB modules from manufacturer I trust. While I have bought Crucial, I would have taken Corsair, Kingston, or Samsung the same.
For disks I opted to go with WD Red 4TB model for now. As my current data actually fits into 2.5" 2TB drive, space-wise I have quite a buffer for the next year and probably much longer. I was toying with the idea to use Seagate Ironwolf due to its attractive 6TB price, but noise level made me stick with WD Red. To minimize any potential issue affecting the whole batch, I actually bought disks at two different places (NewEgg and B&H).
A few curiosities were observed while pairing motherboard and case. First one is lack of opening for display port on the back. While slightly annoying, I found it bearable since HDMI opening, while grossly oversized, was accessible. If you really need display port you can order separate part number MCP-260-00068-0B but it will cost you $25.
Another one is mismatch between chassis power supply that has only 20-pin ATX connector and motherboard that requires 24-pin connector. As motherboard is really modest as far as power consumption goes, plugging 20-pin connector and leaving 4 leftmost pins empty works fine.
I also connected front-panel connector to PCI bracket in order to bring those ports to the outside. I only did it because I had bracket already available. Likewise, I swapped SATA cables that arrived with motherboard with shorter, round ones. This is just purely for cosmetics.
Without further ado, here is the itemized list:
| Supermicro SuperChassis 504-203B | $100 |
| Supermicro X10SBA-L | $149 |
| Crucial 8GB DDR3L Kit (2 x 4GB) | $54 |
| SATA cable, 6", right-angle | 2x $7 |
| Total | $317 |