 With a 4K camera in my family there came a need to find a sweet spot settings for those space hungry videos. In my case, the primary use for my 4K videos is a simple on-disk archiving and an occasional YouTube upload.
For video editing I personally use Sony Movie Studio Platinum 13. It is actually a quite well designed program without a steep learning curve, offering reasonably fast editing, and you get 4K support out of box. Yes, there might be better programs out there but they usually come either at a higher price point, without many options, or without 4K support of any kind. Movie Studio actually has two codecs supporting 4K.
I personally prefer using MainConcept AVC codec over Sony XAVC S. It might be argued that Sony XAVC S actually creates slightly better files than standard AVC codec, but customization options for that codec are non-existent. You get to select frame-rate and that is it. Resulting file is huge and maybe just slightly more manageable than what you get directly out of camera.
With MainConcept you not only get to chose your bitrate but it is also viewable on any MP4 supporting device. Yes, quality probably suffers a bit but you can improve it significantly by wisely selecting among many options. It might not be perfect but it is trouble-free - especially when your video has to be handled by a third-party.
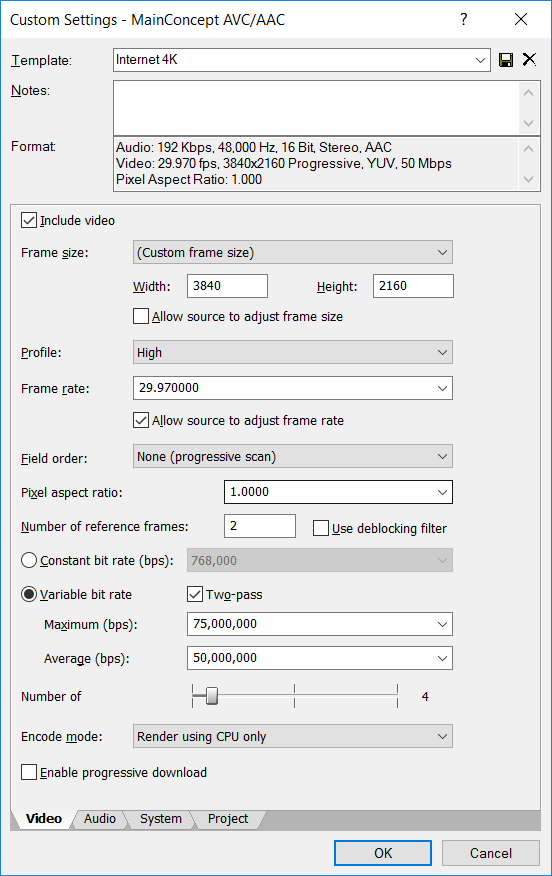
In template creation I started with Internet HD 1080p template and set frame size to 4K resolution (3840x2160). Why? Because I am lazy and that template is actually quite close to what I want.
For Profile I go with High. In theory using Baseline will offer you the most compatibility with devices and allow for playback on even older MP4 players. Main profile would allow for a bit smarter encoding, improving quality but requiring a bit more powerful playback device. High profile gives you the best quality with all the bells and whistles H.264 can offer but it will require a powerful device and a well built player. While it might be tempting to go with Main or even Baseline, this is completely unnecessary because we are not in 1080p land anymore. Pretty much any device capable of 4K playback supports High profile.
Frame rate and field order I never change. When creating project you can tell Movie Studio to match your video frame rate and just use whatever native framerate your camera gives. In my case that is 30p progressive NTSC and I use it throughout the edit process. Same goes for pixel aspect ratio I am yet to see be different than 1.
For number of reference frames I stick to the default of 2. In theory having more than that (up to 16) is allowed but I usually don't go there. Reason is encoding time. While more reference frames can help with better motion detection, they increase time linearly without noticeable improvement in this particular quality. Where I did find them useful though is when encoding cartoons or something else that has a clean animation. For real-life footage, two is more than enough.
As my camera outputs 100 Mbps video, it makes sense to go lower to grab some file size savings. But how low is really still practical? I found my sweet spot at 50 Mbps average. This is still reasonably high that you don't lose much of image quality even when it is shot in low light, noisy conditions. For occasional more complex scenes I usually allow for maximum of 75 Mbps (or 100 Mbps is video is really dynamic).
To help codec understand relative complexity of scenes and where to put that extra thump, I always go with two-pass encoding. Mind you, two-pass encoding will prolong your encoding time - you've guessed it - by (almost) double. However, the final result is worth it as you get the maximum bitrate when you need it and total file size is spot-on. Codec can try to do that dynamically within a single pass but two-pass approach leaves the guessing element out of it.
Number of threads I usually leave at default of 4 because I found it works well with my 4-core, 8-threads processor. It will keep my processor probably at around 90% usage allowing me to still use it for less intensive tasks while rendering is ongoing. And I render using CPU-only although I have a CUDA graphic card. While faster, CUDA algorithms have a noticeable quality drop (best explained in this video). Since I usually render my videos during night, I see no benefit in quality-for-speed exchange.
While I am at it, I also disable progressive download. Since I don't stream these videos there is no benefit in using it and without it encoder can squeeze some extra bits.
Audio I leave at 192 Kbps at 48 kHz. Realistically, for audio I record 95% of the time, even less than 128 Kbps would be sufficient and probably nobody could hear the difference. However, cost of leaving it at default is minuscule enough that it is not worth thinking whether this video is one of those 5% where I have some music going on.
So, these settings work for me and I've tried to explain reasoning behind them. Your mileage may vary.